Confederate star is definitely waning. They still have a sizeable army and good commanders, but are having trouble holding territory.
The Union blockades of Charleston and Savannah are successful leaving the Confederates with just 4 import supply from New Orleans. They get 60 supply from Atlanta and New Orleans. Luckily for them they are carrying forward 173. They therefore now have a total of 237.
The Union have 193 supply. They have 20 personnel points to the Confederate's 10. The Confederates create 8,000 garrison troops, a supply train and order another ironclad leaving them with 141 supply.
The Union augment small divisions from St Louis and Washington to 10,000 man units. They convert 3,000 militia to infantry, lay down a river flotilla and a river transport and commission a new rail road repair unit. They are left with 65 supply. This being an even turn, militia are raised in St Louis and Bowling Green.
The Confederates deploy 10,000 garrison troops to Vicksburg. Partisans appear in Missouri.
The Union receive a Naval Flotilla on the east coast. In St Louis they get an ironclad and a river flotilla. A 10,000 man strong division is raised in Bowling Green, 1,000 garrison troops go to Washington and there are 6,000 militia for later deployment.
The Confederates allocate 30 supplies to building a fort at Baton Rouge which they successfully accomplish.
The Union finally get an Army HQ. Lyon returns from sick leave. Ord and Grainger join the Union and Sherman is given the new army command. Burnside is given command of Crittenden's old corps on the Mississippi. Lyon gets command of the VII Corps in St Louis. Grainger is posted to Washington. Ord goes to Cairo and Sherman, with the Red Army, goes to Bowling Green.
The Union consume 46 supply and 14 rail leaving them with 19 supply and 21 rail. Halleck is unsupplied but feeds himself.
The Confederates use 24 supply and 15 rail. The militia in Montgomery, AL, desert. Polk, whose men are also out of supply, hold on. The Confederates have 117 supply left and 5 rail.
Week 93
The Union get the 5 initiative chit.
Sumner is sent to deal with the partisans in Missouri which he does with ease.
The 3,000 cavalry languishing in Fayetteville, AK, are ordered down the Arkansas river.
Burnside sends reinforcements to Buell, but stays put in Arkansas Post to keep an eye on Polk.
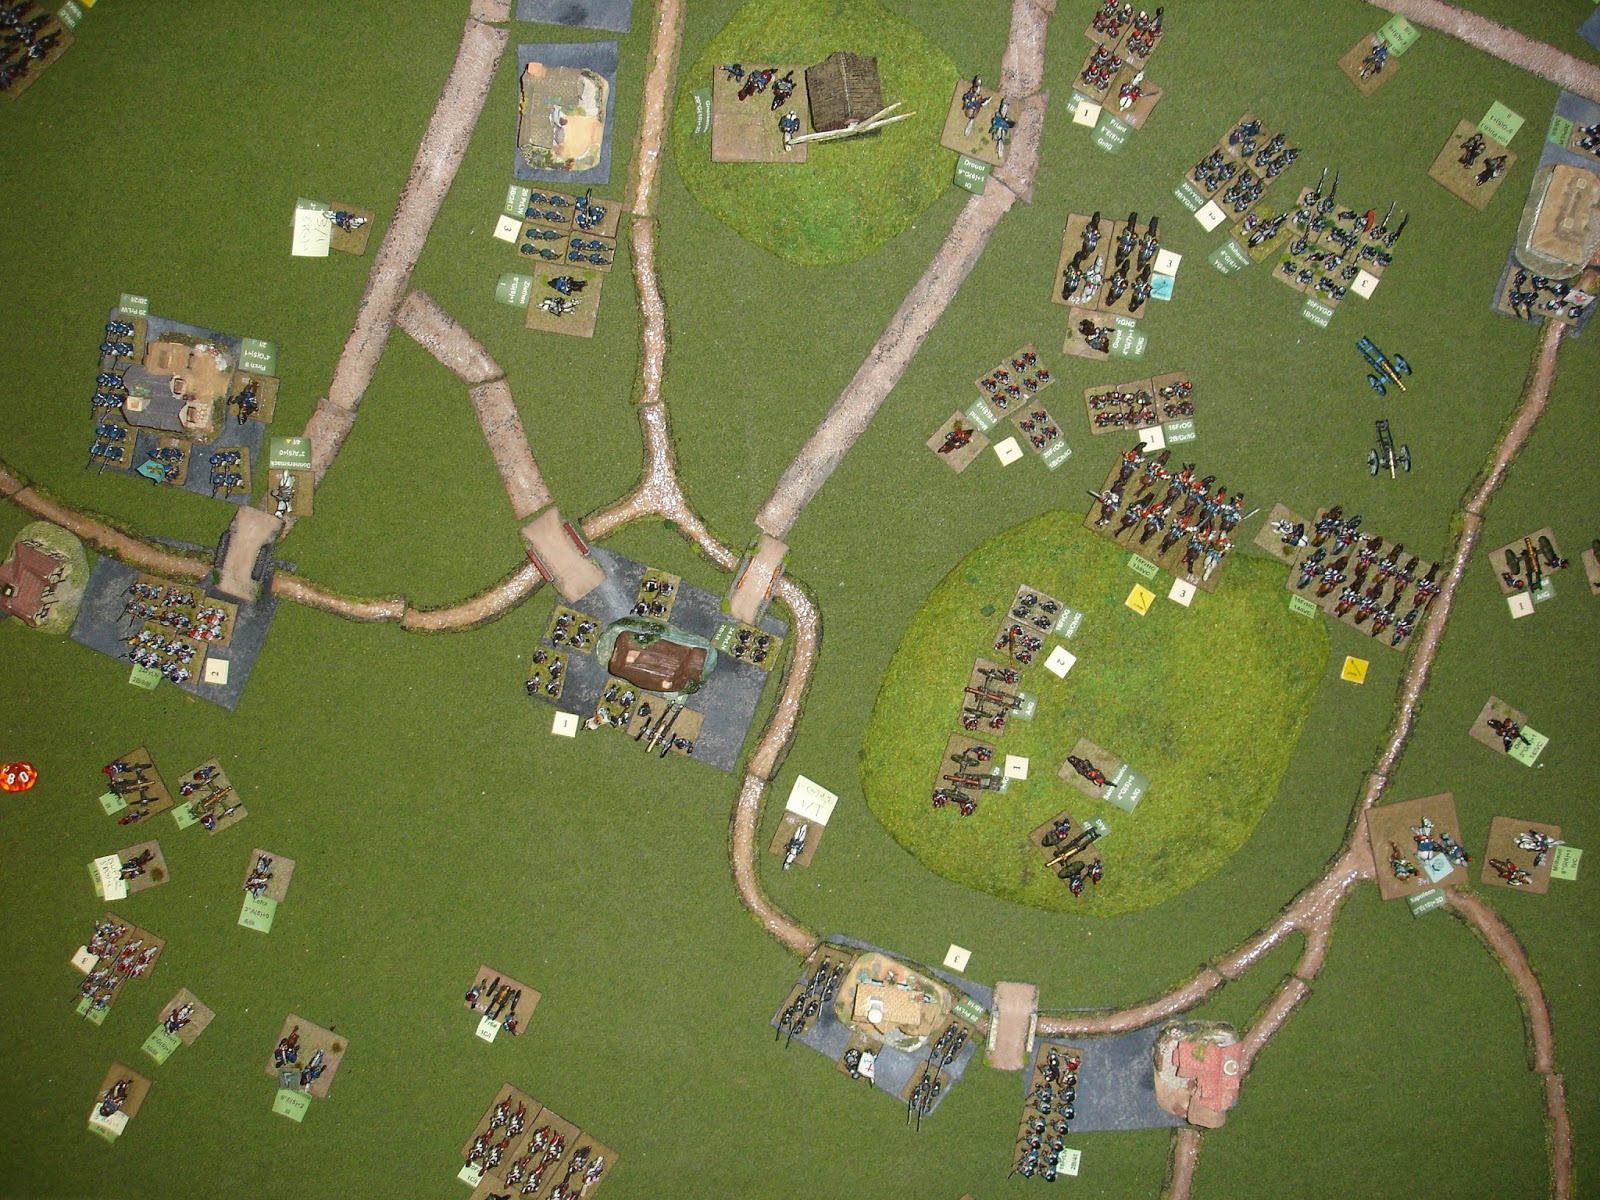
With the garrison of Richmond safe within its fortifications, Meade is ordered to get in and conduct a close siege. It might have been wise for the Confederates to leave the garrison outside so that the Union would have had to fight their way in.
In contrast the fort at Petersburg is garrisoned by 2,000 men with 10,000 arrayed outside under the command of Breckinridge. Thomas is ordered to march on him and with consummate skills (i.e. a good die roll), forces the Confederates to retreat. The march attack went in on the 111-130 column and there was a 66% chance of success given Thomas' modifier. Stuart's raid on Norfolk, although very destructive, really required that he make an immediate return. The Union going first ruined that (and also meant they could move on Richmond).
Without waiting for orders, Lyon hops on a river boat and sails down the Mississippi to be with the action. Unlike Lyon, Crouch decides to go north from St Louis to pick up the militia at Hannibal.
Ord stays put in Cairo, but Sherman heads to Nashville. Sickles pulls back from Chattanooga in order to rendezvous with Sherman and also in the hope that A Hill will follow and become trapped on the northern banks of the Tennessee.
In a bit of a shock, Halleck finds his previous bold move has left him isolated. Worse this means his initiative one less effectively reducing it to zero and impotence. Hooker heads west in an attempt to capture Montgomery, AL.
Banks does nothing.
Granger, newly arrived in Washington, is given the job of removing lingering rebel presence in the north of the Shenandoah Valley. He heads to Hagerstown. Heintzelman heads to the front, but his immediate task is to pick up the supply train at West Point.
The Generals on the James stay put, preparing for the spring to renew the offensive. McClernand does contemplate an attack on Lynchburg, but the river is too high to facilitate a crossing.
Thomas storms Petersburg, losing 4,000 men, but capturing the fort.
The Confederates sensing that Polk is a bit at risk (and Arkansa a lost cause) order him to Louisiana.
Stuart is ordered back to Petersburg, but it is a tad too late.
The brigade occupying Newman, GA, is ordered to retake Columbus seeing that the Union have vacated it.
A Hill and Buckner hold their positions on the Tennessee. Walker in Atlanta makes sure Newman is occupied, as is Decatur.
The key Confederate generals defending Vicksburg display no initiative.
Attention switches back to the east where Beauregard attempts to attack Meade. Both sides lose 3,000 men, but Meade stays put.
In studying the Richmond front, the loss of Petersburg has put it out of supply...
The red lines show the limits of the Confederate supply lines.
Now I see the importance of the building Greensboro-Danville line.
Week 94
The Union get the 1 free initiative chit.
Time for the Confederates to pull back.
Taylor, who should have been made a Corps commander by now, is sent to Raleigh to take command of that Department. It seems he said "Told you so" one too many times to the powers that be.
Beauregard retreats with Bragg (mislabelled as Johnston) and Price. D Hill is also ordered back, linking up with Bragg south of Appomattox. To say the mood is glum would be a colossal understatement. Beauregard takes 20,000 men to join Breckinridge intent on attacking Thomas.
A Hill on the Tennessee decides his invasion has gone far enough and pulls back to Kingston, GA. Bruckner and Walker can't see what all the hurry is about.
Forrest decides he would be better of in the east with his cavalry. Jackson and Hardee have a debate about whether this is a good idea or not. Magruder has a plan and grabs all the militia and marches to Natchez. Amazingly no one deserts. A Johnston moves to Hardee and Jackson giving a better look to the Army of the Mississippi.
On the other side of the Mississippi, Polk doesn't move, too busy reading all the bad news from over East. Down at New Orleans, there is nothing for Ewell to do, or is there? He can't think of anything yet, but I can.
Does Beauregard attack? Not exactly, he's clever and tells Stuart to attack on his behalf. He makes an all out attack on the 161-200 column of CRT 3. Someone needs to explain what "all out" means. No supply is used, both sides lose 10% casualties, which is 2,000 for the Union and 4,000 for the Confederates (which includes some of Stuart's troopers). Thomas has to retreat so this is a stunning Confederate victory, not. Petersburg is a city and so Thomas doesn't have to retreat (and even if he had he could have moved some of his men into the fort there that he now holds - he did right to storm it the previous week).
The Union ordered Halleck back to Columbus where he can trap the Rebel brigade and still be in supply.
Hooker, drawing supply from the Alabama River proceeds to Montgomery.
Sickles forces a crossing of the Tennessee. It's rough and a 1,000 men perish in the winter floods. Sherman advances towards the Tennessee.
Lyon gets off his paddle boat in Marion and then proceeds on horseback down to the Arkansas River. He is headed for the cavalry which, being a 4 Initiative Level leader he can actually command [16.21]
Burnside is dazzled as Lyon dashes past and is left immobile in wonder.
Buell and his fellow generals in the Army of Missouri all fail to move. There is a petition to change the name of the Army to be the Army of the Mississippi but they are thwarted when they find the Confederates have already appropriated that name.
Further up the Mississippi, Sumner moves to Ironton always on the lookout for partisans and draft dodgers. Ord moves to New Madrid.
Banks is busy organising some cotton pickin down on the gulf.
Only Franklin has the initiative to cross the James. Thomas however has the initiative to swap some troops with Sedgewick to bring his force in Petersburg up to 23,000 men. There is no other movement in the Union camp.
McClernand attacks Smith on the 131-160 column of CRT 2. Both sides lose 2,000 men, but the Union are unable to get across the river.
As they say, it's big out West.
Week 95
The Union get the 2 chit.
The Confederates have their stable 3 free initiatives. It is not enough, especially when one needs to be spent in the opposite theatre, something they failed to do last turn. Oh dear, maybe this means they need to forfeit the game? Blah! The Confederates are past caring about the rules, this is war!
Smith and Hindman are now ordered to pull back to safety. There is a lot of debate about whether the new defensive line should be established on the Appomattox River (not really viable now the Union hold Petersburg), the Nottaway River (not long enough) or the Roanoke River (too long). Where is the Goldilocks River?
The situation at Vicksburg is not good. The Confederates are heavily out numbered. They have better generals, for the moment, but can easily be cut off. What to do?
In a reversal of expectations, the Mayor of Petersburg points out to Thomas that his principality is just a town, not a city and that he has to leave. Thomas says "screw you!" Oh dear, mistakes will happen. I also see that I had thought Lynchburg was a city and that had foiled McClernand.
So it goes.
Forrest's trek east now looks problematic given the bifurcation of the Confederacy by Halleck, Hooker and Banks and their command of the key rivers and railways through Alabama and Georgia. Forrest uses very harsh language to describe what he thinks of this and marches back to rejoin the Army of the Mississippi. He is posted south of Yazoo City (which a careful check proves to be not a city). Here at least he will stop or delay any Union attempt to get around behind Vicksburg.
Ewell wastes time talking to Floyd in New Orleans.
Magruder wants to build a fort at Natchez, but finds none of the militia units have any engineers. He lacks the initiative to go and get them from Baton Rouge. The rest of the west is as good as it gets (for now).
Back east Stuart, furious over having been thwarted by Thomas' lie that Petersburg was a city, attacks again. The battle is on the 111-130 column. But what CRT to choose? If Stuart goes with CRT 3 he has only a 1 in 6 chance of forcing Thomas to retreat. CRT 1 or 2 give a 1 in 3 chance. Thomas dare not escalate as CRT 4 would give a 2 in 3 chance of retreat. Stuart goes with CRT 2. (Aside: tricky things these Combat Result Tables in this game.) Stuart gets a perfect result. Caught out in his bluff, Thomas retreats. There are no losses.
10,000 Union troops do however occupy the fort at Petersburg. Thomas points out that the ironclad that was there should have come to his aid. Whoops. (Aside: nothing like human frailty to add to the turbulence induced by Lady Luck into the joys of solo gaming.)
The Union order the underutilised cavalry division to keep pushing down the Arkansas River and ultimately to meet up with Lyon.
McClellan is ordered to pursue the Confederates. He asks where have they gone? He's told "South."
Meade swaps his half full divisions for Sedgwick's depleted ones. Sedgewick then leaves them with Thomas and goes and joins McClellan. McClellan informs Sedgewick that the Confederates have established a formidable defensive line on the Appomattox River and that more reinforcements will be required before they can even begin to think of advancing.
Pope and McClerand argue over who will be first into Lynchburg, meanwhile McPherson liberates the city, eh town, while advancing to Roanoke River, looking for rebels.
Sherman heads for Chattanooga, but Sickles, on the other side of the Tennessee fails to move.
Banks, having heard Forrest is on the move, heads directly north, up the Tombigbee River. His information is a bit old, but shows that Forrest was right in determining supplies for any eastward trek would have soon been exhausted.
Lyon doesn't wait for his cavalry to get to him, he goes to it. What a man!
Burnside stays at Arkansas Post reading the mail.
Crouch sends the militia in Hannibal back to St Louis and then heads to St Joseph.
Buell attacks Johnston in the Battle of the Armies of the Miss. The combat takes place on the 161-200 column of CRT 1. Buell hands out plenty of ammunition to his 57,000 men and expects to inflict significant losses on the 26,000 Confederates. Jackson suggests they can retreat, but that will expose Vicksburg. They have to fight. They lose 2,000 men and the Union the same. Johnston dodges a bullet that was meant for a corps commander.
The Confederate withdrawal in the East.
Week 96
The Union get the 2 chit again.
The Confederates come up with an elaborate plan to save Richmond. Send troops to Bermuda Hundred and build a fort which will cut off Union supply to Petersburg.
Price moves to Bermuda Hundred. Beauregard orders Stuart up river to take over where Price was guarding and then moves to Petersburg to take personal charge of the siege.
In the West, engineers (regular infantry) are sent from Baton Rouge to join Magruder in Natchez.
Polk decides to head to the Mississippi in order to find a crossing point for his 8,000 men.
Ewell gets tired of listening to Floyd tell him how the war could have been won, but then realises it is too late for him to do anything.
Johnston, in command of the Army of the Mississippi considers his options, but does nothing. Jackson pulls in a few reinforcements from Vicksburg. Hardee goes to Vicksburg to take command.
Bruckner decides it is no longer safe on the Tennessee and pulls back to Talladega. A Hill, in Kingston, can't decide what to do. Walker, in Atlanta, is of the same mind.
The Generals in the East hold position
The Union hurriedly transport supplies to the besieged troops at Petersburg.
On the Tennessee, Sickles is ordered to pursue A Hill and does so, clearing the way for Sherman to follow, re-liberating Chattanooga and a number of nearby towns.
Burnside is ordered to cross the Arkansa River and proceed down the Mississippi.
Lyon, the hero of the West, occupies Little Rock, AK.
Ord sits put in New Madrid, having been told there will be a bullfight, fake news that was put about by Confederate sympathizers. Sumner returns to St Louis having collected a 1,000 militia. Crouch seems happy in St Joseph, what a waste.
Buell holds a planning session, but nothing seems to be concluded.
Sherman crosses the Tennessee, says thanks to Sickles and proceeds to occupy Dalton, he plans to do an "attacker wriggle" ...
Halleck is active along the Chattahoochee, but Hooker remains idle in Montgomery. Banks shows how it can be done and captures Winchester on the Pascagoula River.
Back east Heintzelman gets the supply train moving that had been left in West Point, VA. Pope and McClernand continue arguing about who will be first to enter Lynchburg. McPherson has to content himself with further securing the north bank of the Roanoke River.
McClellan writes more letters to Washington demanding reinforcements so he can finish winning the war. Sedgewick and Howard are forced to sit quiet while he reads them his letters, which are quite lengthy, in fact very lengthy and repetitive, with much use of long archaic, multisyllabic words.
Franklin makes an attempt to cross the Appomattox, but Stuart is too clever for him and spoils his preparation, but nearly gets wounded in the process.
Thomas plans an attack, but just doesn't have the numbers and fails to get approval. Pity, as he knew, that against Price he had a 50% chance of success.
Franklin considers attacking again, but fears he's missed his chance. Sedgewick slips out while McClellan is busy making numerous supplementary revisions to his fifteenth draft of his twenty fourth letter to the President. He successfully attacks (using the wriggle) and occupies Burkeville over the Appomattox. This will cause Stuart supply problems. Sedgewick is able to use the railway bridge to secure his supply lines. Sedgewick is suffering hearing loss but it seems to be receding now he is close to the action.
Sherman doesn't wriggle, he decides he's not that kind of guy - if there's no rebels to kill then he's not attacking.
Buell would like to attack, but he is busy writing up the outcomes of his planning conference, which at first read sound like "wait till someone else wins the war and then take the credit." Buell at least realizes this will take careful wording.
The Mississippi theatre of inaction.
Sherman's coming and he has matches...
Virginia, where time is running out,
and many mistakes have been made.
Casualties
14,000 men are no longer for the Confederacy. The Union lost 13,000, which, in these dark times, is considered winning.