Thursday, December 20, 2012

Bocage – Part 2


The first planting (Photo taken 10:25 AM 17/12/2012):

 
The second planting (Photo taken 5:24 PM 17/12/2012):

 
Detailing commences with a dry brush of Tamiya Flat Earth and the building of the gate out of toothpicks, which was actually quiet fun  (Photo taken 9:57 AM 18/12/2012):

 
Fence gate finished and flocking commences (Photo taken 1:57 PM 19/12/2012):

 
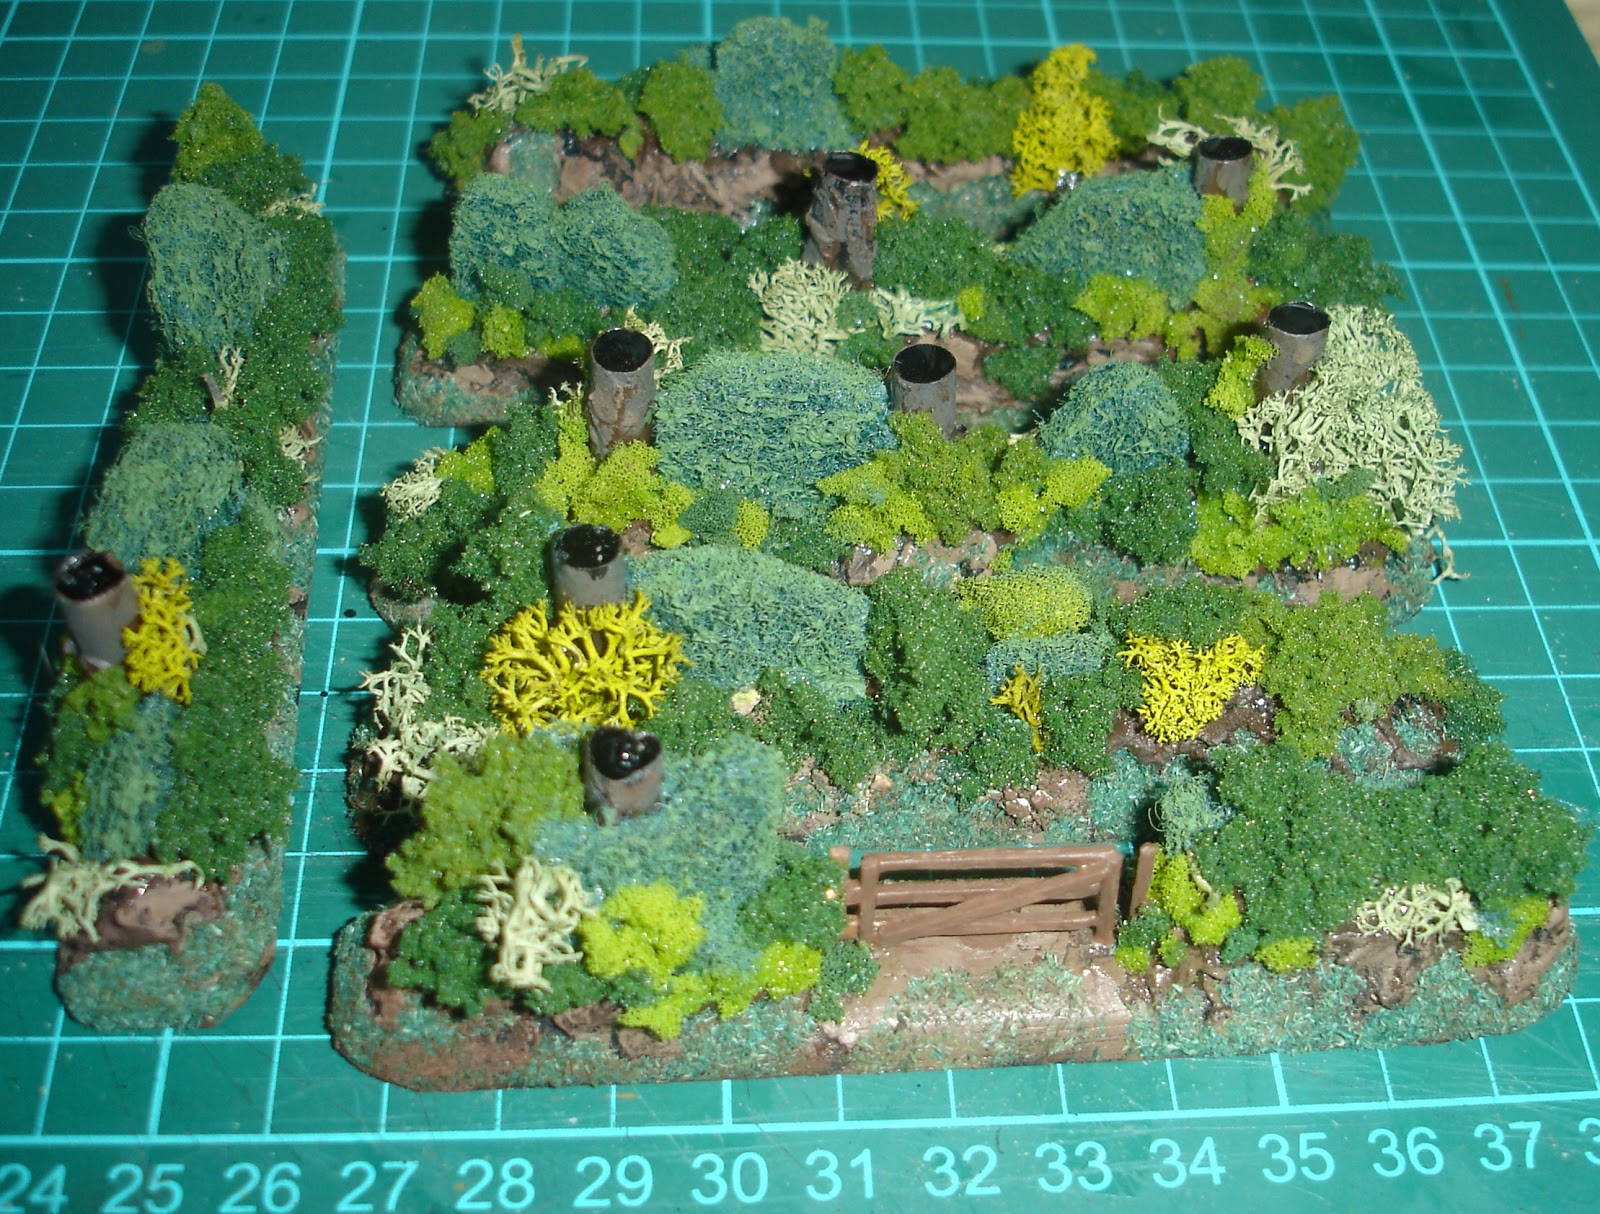
Flocking finished.  I was going to do more work on the hedges, but decided they didn’t need it (Photo taken 6:58 PM 19/12/2012):

 
Bocage finished with matt varnish.  I must make some fields and roads to better show them off, but I’m very happy with the result.  Actually, they turned out much better than I expected.  The surprise “ingredient” was the plastering which ended up looking like tangle tree roots and gives a good earth bank effect I feel.

 
Perhaps the tubes (which are, after all, just cut up black drinking straws) used to hold the trees could be a slightly smaller diameter, but this is really lost on the table top and besides the hedges are supposed to be a thousand years old so good fat trunks are appropriate.  In the “blown up” photo the source of some of the hedging is a lot more apparent than on the table top; perhaps the old scouring pads need more hacking, but they do provide a bit of body to the hedge which helps in handling (which is also a benefit of the embedded straws).

 
And as this was my 100th post, and close to my anniversary of starting this blog two years ago, I feel good to present this completed project.

Sunday, December 16, 2012

Bocage – Part 1


The world probably doesn’t need another post on how to model bocage, but these posts are always more for my benefit, so here goes. 
The work has been pretty quick.  While I didn't keep a record I have put in the time the photos were taken.  Normally I have been working in about 15 minute slots with plenty of time for drying.  I have put in plenty of research (i.e. surfing) time.  There is lots of inspiring stuff out there.

First I bought some semi round wood mould and cut six experimental strips, sanding down the corners so the end result looks like a big brother for the pop-sticks I have been using recently for hedges. (Photo taken 4:10 PM 14/12/2012)
 
Second on with PVA glue, some of the larger “stones” from the kitty litter and a few bits cut off a black drinking straw. (Photo taken 7:30 PM 14/12/2012)

 
Third step was more PVA glue and a finer grade for kitty litter, however in future I would probably drop this step as it was a bit fiddly with the kitty litter scattering a bit too much and the finished result getting largely covered up in the next step. (Photo taken 9:56 AM 15/12/2012)
 
The fourth step was covering with plaster.  I used the type of crack filler that comes ready prepared and as my tube was a bit old I just mixed in a bit of water to get better flow. (Photo taken 1:45 PM 15/12/2012)
 
The fifth step was undercoat in black using trusty Tamiya black and then a base coat of Tamiya flat brown.  I wanted a dark look and hope that this approach will provide that. (Photo taken 10:45 AM 16/12/2012)


Next will be to add the hedge and I’m currently looking at various ways of doing this, but that will be part 2.

Saturday, December 15, 2012

Alexandrian Macedonian Starter Army


After the last game of Field of Glory I checked my ancient figures to see if I could make another army besides Classical Greek.  I discovered I was one stand (3 figures) short of the Alexandrian Macedonian Starter Army, for the Agema no less. 

My Tin Soldier ancient army had been commenced in the mid 1980s for WRG 6th Edition; while predominantly Greek (as in Hoplite) I had started to expand it to cover Macedonia and the Successors as well as rebasing for 7th Edition (and even a bit of DBM although those rules never “did it for me”).  I hadn’t painted any of these figures in close on twenty years – could I match the style or would the new recruits stand out like the proverbial?

As part of the “blending” I painted all the Agema’s cloaks with the same purple and also touched up the older figures helmets with the same gold colour.  The hardest thing to match was the flock which had faded from a yellow green to dark yellow.  I just altered my blend and got a pretty close match.

Completed Agema:


The whole army was upgraded to magnetic bases:


Here is the army ready for battle (or rather ready to be photographed):


Next is to see what troops I have to expand this army with the optional troops and whether there is motivation to take some more figures from lead mountain.

Thursday, November 29, 2012

Old Glory Napoleonic Prussian Kuirassiers – Part 2


I painted the horses at the same time I was painting my WW2 Australians – there should be a distinct similarity in colour between them and the Australian rifle stocks.  It was just a background task and progress was slow, but then I put them onto my “one colour a day” program and voila!


16PrHC for Napoleon’s Battles based on the dress uniform of the Garde du Corps circa 1813.

The hardest decision as always was just how much detail to attempt.  As an elite unit I did a little bit more than normal.

The only problem I had was the officer.  He was cast with his arm straight out to the side, parallel to the ground and perpendicular to the horse.  I based him by himself (as in just three figures on the command base).  But it just didn’t look right and so the next morning, bright and early, I took a firm grip of his arm and bent it down.  It was if he understood and relaxed his arm to point down.  Then I cut figures off the base to rearrange them to the standard four figure configuration.

Wednesday, November 28, 2012

Machine Gun Nests


As part of my terrain improvement quest I knocked up half a dozen machine gun nests after being inspired by an article at Model Dads:  http://www.modeldads.co.uk/Life-at-the-Front/wordpress/?p=1524.  I had been lead there after a bit of Googling and coming across this article on Big Lee’s blog: http://www.blmablog.com/2011/03/scratch-built-mg-nest.html

I cut some bases from plastic scrap (actually CD case cover which I roughed up with sandpaper to improve its adhesion properties).  Next was cutting up the cocktail sticks (the only bit I would classify as tedious).  I used a bit of Styrofoam coated with PVA glue to give the basic shape and then used lots of handyman plaster to finish off the model.  After that it was painting and flocking.  I used a bit of plastic tubing (there is an associated saga with that I will keep for another day) to create a tree trunk that would accept some model trees I had that need basing (a bigger attempt can be seen in the pictures – that used a drinking straw, but I have since decided I need to get some black straws as the paint on the inside scrapped off with use).


In the pictures can also be seen my attempt at a model minefield (a topic for a future post).


I also did a machine gun nest for desert or rocky conditions (which is how my 15mm WW2 troops are based).  That was just kitty litter and PVA glue.


While I took over a week to complete them, they were just a few minutes each day so as to leave plenty of time to dry etc.

Sunday, November 25, 2012

Field of Glory - Rome versus Dacia


My second game of Field of Glory involved the Early Imperial Romans versus the Dacians.  Richard commanded the Dacians and all figures and terrain was from his collection.
The Dacians hid in the woods and took up a position on a steep hill.  The Romans held back their left flank and advanced slowly in the centre, shifting to their right hoping to mass against the Dacian left.  Unfortunately the right wing Roman Auxiliary cavalry thought it was superior and could take on two units of enemy lancers.  It found this not to be the case.  Their commander died and they struggled on for a short while until they broke.  Auxiliary infantry was coming to their aid, but it also ultimately fared badly against the enemy cavalry.

However the Romans were not overly concerned as this reversal had brought out some of the Dacians into the open.  A Legionary unit went, but got badly chopped up.  A larger unit of Legionnaires joined in and a long struggle ensued until they were finally wiped out by the enemy lancers who took them in the rear (the picture shows the situation just before this happened).
 
 
In the centre the main Legion, after a bit of a setback, cleaned out the Dacian warband after a long struggle.

The Dacians finally came into contact with the much reduced Roman left, and while the Roman Auxiliaries on this flank fought much better than those on the right, numbers were against them.

While there was no overall ebb and flow, the battles were mostly good struggles and nearly all of the table was in use and there were no rules issues.  I am still learning the rules and this slowed us down as I wanted to understand the details of the mechanics as we fought and manoeuvred.

I am looking forward to the next game.

Monday, November 5, 2012

Wargaming as a Diorama


Over two days Richard and I played a game of Blitzkrieg Commander using his very extensive model collection and his custom built terrain.  While both a bit rusty with the rules, they played well and gave a fast moving game.  We hadn’t bothered with points or anything – it was more to use the figures and rules.

The German advance was held up in the marshes and a the Russian armour counter attack, while menacing, was ground down by wait of number son the German right and by a skilful deployment of Stugs on their left (aided by a very good commander).  Both sides had lots of command problems which gave a good air of uncertainty and difficulty.

If we were to play again we should probably be more deliberate on the terrain effects – how dense is the forest, where does its affects come into play, etc.

The only odd thing was the German Forward Air Controller seeming to be able to wander dangerously close to the Russians without much risk.


The German recon unit above did a lot of fighting.


In the above picture the German FAC is way out in front on the left hand side.  Coming down the road is some heavy duty Soviet armour.


In the above picture the KVII has caused the Germans to pause and consider the consequnces of further advances.


Saturday, November 3, 2012

Prussian Landwher Infantry – Hinchcliffe 25mm


I am slowly doing up some figures for Songs of Drums and Shakos and while I already have a few metal 25mm figures based for Napoleon’s Battles, I had this single Hinchcliffe PN13  figure laying around.  He got a paint job when I did the Battle Honours 15mm Landwher.  He has some friends that I have carefully cut from a block of four to now be singles, but that will be for a future post.

Prussian Landwher Infantry – Silesians this time


Another unit completed, Silesians this time.  These were delightful to paint, although the yellow was a bit fiddly, however after sploshing it on I went over mistakes with other colours and the result was a lot better than I expected.  The guys without shoes are a nice touch.


For the record these represent the 3rd Silesian Landwher regiment – in Napoleon’s Battles’ speak 16PrSLW.
That last picture was taken using the flash and gave an inferior picture in my opinion, but I included it for reference and as a reminder to avoid using the flash if I can.

Figures from this unit also feature in my post on hedges.

WW2 Matilda Tank MkIIs – Part 2


Finished. 

I agonised over the colours for the Caunter camouflage scheme.  My aim was to have a faded, used look and so I didn’t want anything too bold.  I was very happy with the VJ 70977 Desert Yellow that I applied over the base coat of Tamiya Flat Brown.  After trying out a few light blues on a scrap of card i had painted with the base coat I settled on the VJ 70906 Pale Blue.  The real problem was with the grey green shade.  To use a light grey looked too much like the light blue and a dark grey stood out too much.  I was having much the same trouble with greens.  One of the first I had tested was a craft paint colour Folk Art 923 Clover.  It gave a poor cover and I put it aside, but after going through other greens I came back to it and decided it gave the best worn look.


After that it was easy to do the distinctive red and white recognition stripes and I also added personalised vehicle names, more for fun than anything.  As the vehicles were meant for Crete I wanted something with a bit of Greek theme and went for Hero (my first choice and easy as only four letters) and based on its success I then called the other two Hector and Hercules.

Finally came the weathering.  I researched rust and settled on using some VJ 70982 Cavalry Brown which I painted on in a few spots and then used my finger to wipe off, just leaving a  stain in most cases and I was happy with that.  My research had also turned up the use of lead pencil to dirty up vehicles and that was the final bit of work I did.


PS These are Command Decision miniatures.

Friday, November 2, 2012

Hedges


I have a long term plan to improve my terrain pieces and after a recent trip to Middle Earth, I mean New Zealand, I was inspired to have a go at making some hedges.  Previously for a Napoleon’s Battles game of Waterloo I had cut up a pot scouring pad into suitable strips and used it as is, with no detailing or basing.  They looked okay, but lacked charisma or stability.  Using the same material, but with bases from pop sticks, ever handy PVA glue, some sand, flock and lots of paint, I went to town making a dozen hedges.

 
I experimented a bit trying to produce something for a sunken road and my first proper hedges I didn’t take all the way to the end of the stick.  A couple I roughed up to break the uniformity.


For my next batch I will add some trees and do a smaller hedge height (these are 15mm, but I will try and see how 10mm looks). I might even try for a gate.

By painting the bottom of the base brown I also figured I could use the hedge sections to fill in as trenches or similar earthworks.