Played my first game of Blitzkrieg Commander. Very impressed. Gave a good feel and quick and easy to play. It's now on my wish list.
http://www.blitzkrieg-commander.com/default.aspx?Area=BKC
Friday, December 30, 2011
Saturday, December 24, 2011
Field Fencing – Part 1
This is a Xmas project and hopefully there will be a Part 2 within two weeks (the time I have off), however at the moment I’m into painting Napoleonics so it might not happen.

I purchased this Peco Lineside kit and decided that for wargaming purposes it would be best to make up into ten separate strips. Pop sticks made the perfect base. I originally started to collect the pop sticks by saving them from ice creams, but I soon realised that was a fattening idea. I ended up just taking ten from a self service drink stand were they were supplied in lieu of teaspoons.

The end of each segment was a bit tricky, but actually went together very well. I had no luck with the centre struts and so left them off. PVA glue worked fine to secure the fence to its base.

Now they are ready to paint and flock.
Here's to a relaxing Xmas and all the best for 2012.
Sunday, December 11, 2011
Stalingrad – Russians – Crossfire
These are my two Russian companies that I have dedicated to the Crossfire Stalingrad scenario.


They have been relabelled with red brown on white for the first (rifle) company and white on red brown for the SMG company.
The figures are a mix of Esci, Atlantic, metal (one Hinchcliffe, but the other metal are I think GHQ). There is even one Matchbox hard plastic figure in there.I hope next time I get to play the scenario the new labels aid playability.


Saturday, December 10, 2011
Leipzig Table A Scenario – Napoleon’s Battles
On 4 December we played the Leipzig Table A scenario, but noted how if we were playing the full battle there would be many decisions on other troops that would be available – this was some of the fun we were perhaps looking for. So far the two scenarios we have played have been totally isolated
The French chose the Mockern road and while it took time to get their long march columns on the table they quickly deployed facing north. Command was an issue as Ney is only 4 and Marmont is a 7. Both have a 10” command span. The special arrangements for the command of continuous columns is something that has recently been commented on in the Napoleon’s Battles Yahoo Group and it was certainly a factor in this game. See http://games.groups.yahoo.com/group/napsbattles/message/14643
The Russians arrived on time and passed thru Lindenthal as can be seen in the first photo. Note the model used to denote the village of Lindenthal was actually moved (saved) and placed with Mockern as its position on the table edge were a lot of movement was occurring put it in jeopardy of being knocked onto the floor.


The Allies kept up the pressure and at the end held Mockern. Some of their units had been badly mauled, but they had inflicted worse on the French plus captured a lot of the French artillery. The troop quality at this period makes the units very fragile.
This is how the battle ended up:

The Prussians and the French Marines (in dark blue greatcoats were from my collection and mainly Essex with a few AB figures). The Russians and French were from Richard's collection and are Old Glory.
The game took about seven hours, but I'm a rather slow player these days, especially when attacking.
If I was to do this battle again I would move the map significantly to the north west and have the south bordered by the Elster River and the east by the stream that flows from Gohlis to Gross Widderitzsch. The reference material I have that would best aid me in constructing this is the Napoleon at Leipzig board game by OSG. Maybe for a future post ...
Monday, November 28, 2011
Stalingrad - Germans - Crossfire
These are the two German companies for theCrossfire Stalingrad scenario.
After the last game I decided to relabel them so they are clearer and in the order Platoon/Company which seems to be the more natural way of reading the markings.


After the last game I decided to relabel them so they are clearer and in the order Platoon/Company which seems to be the more natural way of reading the markings.

The white background is the first company. The figures are a mix of Airfix, Airfix clones, Matchbox, Esci or Revel (?) and maybe more, plus a few metal figures in the 3rd Plt of 2 Coy (which is the Veteran unit).

Sunday, November 13, 2011
Operation Mercury - Final Installment
25 May
After finding an Allied Task Force in Candia Bay the Luftwaffe make a poorly coordinated attack but still manage to sink the DD Kelvin.The Germans air land more troops at Maleme. They also finally capture the Retimo airfield as the Allies start to retreat.
In the afternoon the Luftwaffe make another determined effort against the Royal Navy and catch Task Force A returning to base low on ammunition. They sink the DDs Greythorn and Griffin and damage DD Vendetta.
The Germans air land troops at Heraklion. The Allied retreat is going well as their rearguard puts up a tenacious defence.
26 May
The Retimo sector has now been vacated and troops are evacuating at Sfakia and Tymbakion. A devastating attack by the Luftwaffe at Sfakia sinks the CL Dido and DD Kimberly and damages the CL Ajax. The afternoon sees the Royal Navy move back out to sea, but the Luftwaffe continue their success and sink the Ajax and damage the DD Janus.During the night the Allies complete their evacuation.
27 May
The convoys ferrying survivors to Alexandria are attacked mercilessly. The DDs Imperial and Isis are sunk and the DD Janus, Kingston, CL Abele and Carlisle all damaged. The Luftwaffe return for the kill in the afternoon, but are largely driven off by allied naval AA. The transport Glenroy is damaged however.
Only eighteen Allied units escaped. Sixteen ships had been sunk. However, the German losses amongst their elite paratroops were very heavy. The final victory points came in as 215 to 327 which gives the Germans a substantive victory.
Summary
An excellent simulation and a good game well suited to solitaire play. While not complex, I did make a few mistakes, but nothing that couldn’t be accounted for by die rolls. I could have handled the German land attacks better and also the Royal Navy. I was satisfied using the Luftwaffe for interdiction on land and sea, while it requires good luck, there is no risk to the Luftwaffe so it gets to keep on attacking and eventually it will get through.
Sunday, October 30, 2011
Operation Mercury - Part 6
24 May
The Allies are starting to run short on supplies. The Germans are faced with low supply in the Retimo and Heraklion sectors and are buoyed by the Luftwaffe’s continued interdiction to slow the Allies down.The main Luftwaffe force goes after the Royal Navy and in Almivos Bay and the DD Kipling is sunk. Two German convoys are headed for Retimo and in the early morning one gets through unscathed while the other is shot up losing a lot of its heavy equipment. The amphibious landing is successful and the Germans at Retimo now have significant reinforcements and the battle for the airfield continues.
At Heraklion the Germans succeed in air landing some reinforcements as well. The subsequent fighting is not so successful, but things have tipped in their favour.
At Suda the Allies continue a fighting withdrawal to avoid being outflanked.
In the afternoon, the Allies, short on supply and even low in some sectors (except Suda which has its own problems), with the Germans holding Maleme airfield, a strong grasp on the Heraklion airfield and fighting for the last airfield at Retimo, having suffered excessive losses (well over 70 steps) beginning thinking of evacuation.
The Luftwaffe launch a massive attack on the RN as it attempts to interfere with the German naval landing in Almivos Bay, but are driven off by heavy AA fire. The RN sink the German convoys, but it is too late as the bulk of the German reinforcements were already ashore.
The Germans drop some more reinforcements into Heraklion and airland troops at Maleme.
The Allies start to withdraw. During the night the Germans start to follow up, but the Allied retreat has now commenced.


Saturday, October 29, 2011
Stalingrad - Crossfire
On Friday I introduced Richard to Crossfire using the Stalingrad scenario, something for which I had purpose built the terrain. The picture is old, but shows the full setup, all made up out of cardboard, litter and lots of glue and paint.

Having taken a bit longer to set up than I expected, i think I need to better mark on the cloth where the buildings go.

Having taken a bit longer to set up than I expected, i think I need to better mark on the cloth where the buildings go.
The other problem was being in easily telling which squad belong to which platoon and company. It also didn’t help that the subtle identifies I had used read company/platoon left to right, rather than platoon/company which was how I had it in the OB; so a little refinement is perhaps called for.
The hidden movement works well and makes this a great game.
Friday, October 21, 2011
Operation Mercury - Part 5
23 May
The Germans are now short on supply in the Retimo and Heraklion sectors, but the Luftwaffe do their best to pin down the allies in these areas. The Luftwaffe’s main focus is the Royal Navy, but they were unlucky in attacking a RN task force in Almivos Bay. However a German convoy was able to elude the RN and land troops in Candida Bay near the contested airfield. These fresh troops drive the allies from the remaining parts of the airfield. (It is at this stage that I realise I have been conducting attacks with more than six stacking points, but I’m not sure it would have made a big difference and so decide to continue).
The Germans are closing in for a kill at Retimo, while at Suda they decide to work around the allies left flank, but it is slow going.
In the afternoon the Luftwaffe return and this time in Candida Bay the Stukas brave a lot of AA and sink the Calcutta and damage the Coventry and Jarvis. There is then a surface battle in which all the Italian forces are sunk, but with another RN ship going down, the Jaguar.
The Germans fight desperately to clear the area around the Heraklion airfield. At Retimo their attacks go nowhere and the Australian counter attack is as equally ineffective as is a British attack at Heraklion. The war of attrition at Suda goes in favour of the Germans.
German night attacks fail to make any progress and are driven off with heavy losses at both Retimo and Heraklion. But at Suda the Germans are able to swing round the allied left.
An uncoordinated attack by the newly arrive Argyll and Sutherland Highlanders suffers heavy losses at Heraklion, but at Retimo the Australians break through and reunite with the troops holding the airfield. The allies start to withdraw from Suda.


Saturday, October 15, 2011
Leipzig Table B Scenario - Napoleon's Battles
The plan is to play these in the sequence B, A, D and C.
The first scenario, the attack on Lindenau, had already been played by Richard and the Austrians were able to shoot their way in fairly easily, so this time we decided that a double hit is required on a fortification. For our game on 9 September 2011, Richard took the French side. All the figures are from his collection apart from some dashing Prussian Hussars dressed in black that were mine.
The first scenario, the attack on Lindenau, had already been played by Richard and the Austrians were able to shoot their way in fairly easily, so this time we decided that a double hit is required on a fortification. For our game on 9 September 2011, Richard took the French side. All the figures are from his collection apart from some dashing Prussian Hussars dressed in black that were mine.
It took the Austrians until 11:00 to be in a position to attack and this can be seen in the two pictures, the first of the position in front of Lindenau and the second before Connewitz and Dolitz.


At Connewitz the Austrians succeeded in wresting control of the town from the French. Further to the south, although they had some success, the Poles proved to be of tougher stuff and drove off the Austrian cavalry that had so cautiously advanced through the heavy wood, going much slower than they needed.
French reinforcements arrived and threw the Austrians out of the northern part of Lindenau. The Rhineland troops held on as the Austrians continued to bombard away, slowly whittling them down.
These two pictures are from 13:00 after the French counterattack at Lindenau, but before reinforcements arrived at Connewitz.


The Old Guard appeared and retook the town, bundling the remaining Austrians back across the river with ease.
The Austrians pulled back at Dolitz, but at Lindenau weight of numbers took its toll and the French were pushed back to a final line of entrenchments covering the bridge over the Elster River.
The last pictures are from 16:30 and the end of the scenario.


This scenario really puts pressure on terrain (as you can see we had a few gaps in our river) and raised a few issues.
When is a brigade in a town compared to being deployed in a town? Is it in a town after occupying the position of any enemy it has dislodged?
Where is it placed? And if it takes up more space, is that right?
Do roads create a clear space in terrain so, for example, a battery can be unlimbered? Do roads negate terrain for movement? Or only if in march column perhaps?
Sunday, October 9, 2011
Operation Mercury - Part 4
22 May


The Germans find themselves short of supply and unable to reinforce Heraklion as they only hold half the airfield. They successfully interdict in the Maleme and Hearklion sectors and the Luftwaffe goes after the Royal Navy in Candia Bay sinking the Naiad. An uncoordinated attack on Hearklion airfield is easily beaten off by the Allies and there is a bloody stalemate at Retimo as the Germans get desperate. A war of attrition is also occurring on the way to Suda bay.
In the afternoon the Luftwaffe keeps up its attacks, sinking the Kandahar in a massed attack in Almivos Bay.
The German convoys set sail.
There is further desperate fighting at Heraklion, but the Allies hold out. Things are different at Retimo as the Allies find themselves surrounded and starting to run out of troops to defend the airfield. An attempt by the Australians to breakthrough during the night is defeated.
Meanwhile on the approaches to Suda the German attacks are not well coordinated, but the recently arrived Mountain Division troops are starting to work around the allied southern flank.
The Royal Navy pounds the Germans around Retimo and Heraklion


Thursday, September 29, 2011
Operation Mercury - Part 3
21 May


Luftwaffe interdictions were not so absolute over Maleme and Heraklion and a morning strike against the Royal Navy in Candia Bay was easily driven off. The Germans attacked the retreating New Zelanders around Palatanus and vicious fighting occurred around Galatas as the Germans attempted to cut off the NZ retreat.
Fighting at Heraklion airfield saw the Royal Navy successfully bombard the Germans, but in the afternoon the Luftwaffe returned and sunk the Gloucester and damaged the Fiji. The Germans renewed their attack and captured half of the Heraklion airfield.
The Germans made no progress at Retimo and their attack on Galatas was bloodily repulsed, but they did destroy the Maori battalion which was positioned close by.
The British launched a counterattack at Heraklion even using armour. However their attack was uncoordinated. The fighting was desperate and the Germans were very badly mauled, but just managed to hang on.
More bloody fighting at Galatas, but the New Zealanders were able to slip away to regroup at Suda Bay. Meanwhile the Australians commenced to counterattack at Retimo.
The plan for 22 May is for the German’s to reinforce Heraklion as the situation is dire.


Saturday, September 24, 2011
25mm Metal Ancients - Javelinmen
This post was inspired by Tim Gow's post http://megablitzandmore.blogspot.com/2011/09/blood-sweat-tears-and-superglue.html
First up here is an old and sadly poor quality photo that I scanned in that shows what is a WRG Ancients 6th addition game (or possibly even 5th edition) from the early 1980s.


Nearly all of them have had their spears redone. In fact, in taking the unit photo, one of the guys dropped his spear so I need to go find the superglue and effect a repair.
First up here is an old and sadly poor quality photo that I scanned in that shows what is a WRG Ancients 6th addition game (or possibly even 5th edition) from the early 1980s.

At a guess the bulk of the figures would be from my friend Myron's collection. I never had enough 25mm figures to do more than a nunit of barbarian javelinmen ... and here they are:


All Hinchcliffe with one Minifig ring-in to make up the unit. I was going for the "hairy chested" look. I also did something I thought was a good idea at the time and had removed their bases. Doh!
Here are some more 25mm Ancient Javelinmen from my collection:

From left to right they are Hinchcliffe and then Minifigs PB121, PB16, PB177 and PB163. The basing style was to match in with my playing surface which was a table-tennis table.Nearly all of them have had their spears redone. In fact, in taking the unit photo, one of the guys dropped his spear so I need to go find the superglue and effect a repair.
Operation Mercury - Part 2
20 May PM and Night
On the afternoon of 20 May the Luftwaffe very successfully heavily interdicted all sectors. The drop on Retimo saw the loss of three companies with the bulk of the rest of the paratroops dispersed. The Germans captured the Maleme airfield after eliminating the supporting NZ troops in the vicinity. Their attacks elsewhere in the sector were halted or ineffectual, while at Heraklion the Germans didn’t even try to attack.
The remaining NZ troops started to pull back towards Suda and during the night the Germans press home more attacks inflicting heavy casualties as on the NZ force around Galatas. The Australians start to hurry towards Retimo, but too late to save the 11th Australian Battalion which is wiped out in a vicious night attack by the Germans.
At Heraklion the Germans launch a night attack that captures a hill overlooking the airfield. However the Allies fight back and wipe out two companies of paratroops that had been surrounded in the morning.
The Royal Navy had tried twice to bombard the Germans moving into engage them in all sectors but with no luck.
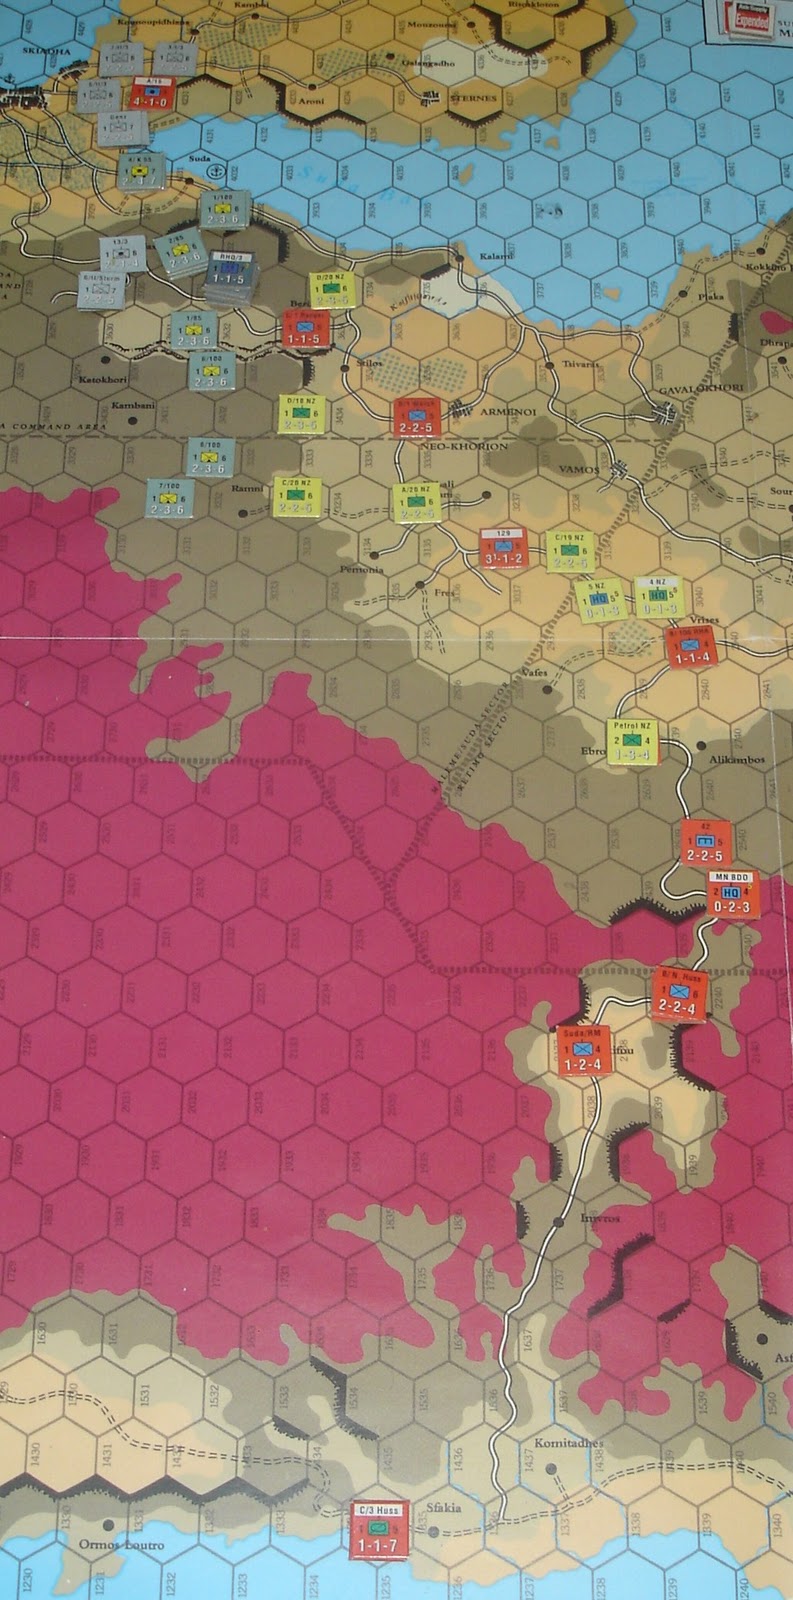
The maps are the situation as dawn breaks on 21 May, Maleme, Retimo and Hearklion sectors in that order and the naval situation map.


The Germans plan to drop some more paratroops around Retimo, air land troops at Maleme while trying to cut off the NZ forces from Suda, send the Luftwaffe after the Royal Navy and hang on around Heraklion.
On the afternoon of 20 May the Luftwaffe very successfully heavily interdicted all sectors. The drop on Retimo saw the loss of three companies with the bulk of the rest of the paratroops dispersed. The Germans captured the Maleme airfield after eliminating the supporting NZ troops in the vicinity. Their attacks elsewhere in the sector were halted or ineffectual, while at Heraklion the Germans didn’t even try to attack.
The remaining NZ troops started to pull back towards Suda and during the night the Germans press home more attacks inflicting heavy casualties as on the NZ force around Galatas. The Australians start to hurry towards Retimo, but too late to save the 11th Australian Battalion which is wiped out in a vicious night attack by the Germans.
At Heraklion the Germans launch a night attack that captures a hill overlooking the airfield. However the Allies fight back and wipe out two companies of paratroops that had been surrounded in the morning.
The Royal Navy had tried twice to bombard the Germans moving into engage them in all sectors but with no luck.
The maps are the situation as dawn breaks on 21 May, Maleme, Retimo and Hearklion sectors in that order and the naval situation map.


The Germans plan to drop some more paratroops around Retimo, air land troops at Maleme while trying to cut off the NZ forces from Suda, send the Luftwaffe after the Royal Navy and hang on around Heraklion.
Monday, September 19, 2011
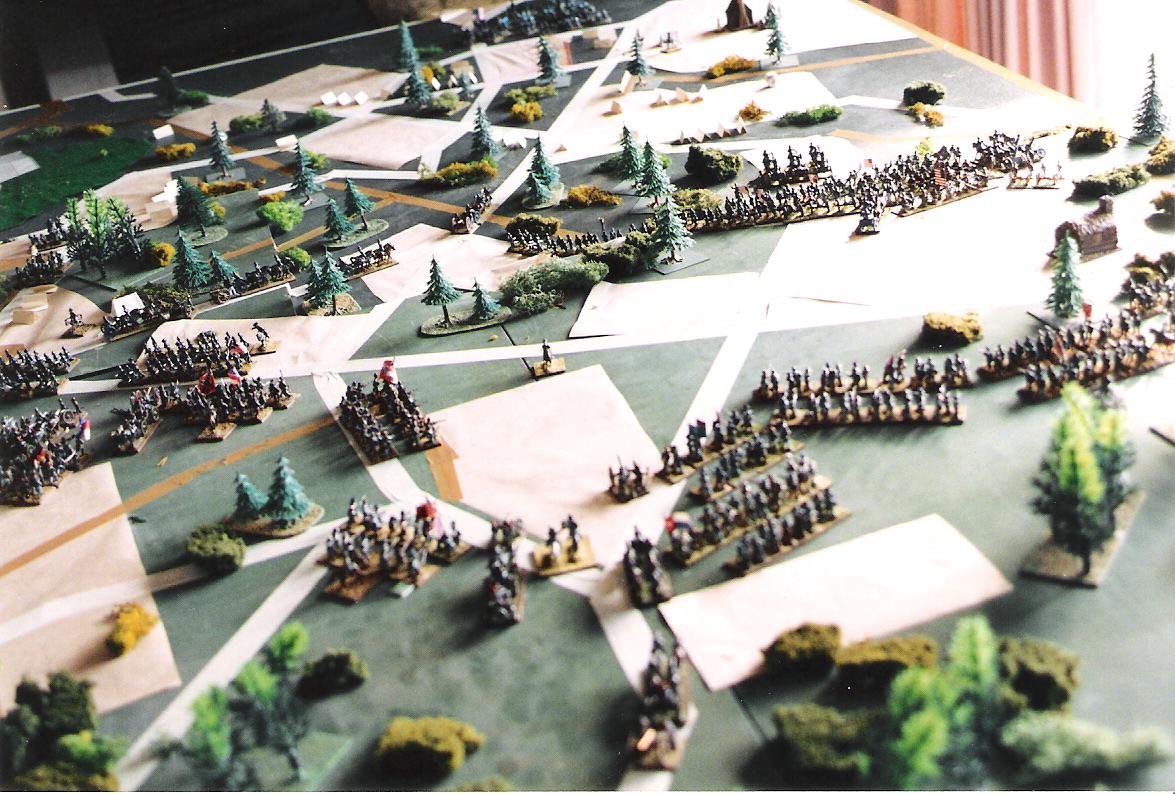
Battle of Shiloh
These pictures are scans of photos taken during a refight of the Battle of Shiloh using Fire and Fury. The only notes I have are that it was 31 December 1992 and that the players on the Union side were Myron, Bruce and Dale while on the Rebs were Brenton and I. My recollection is that the Rebs did not have the historical success of their namesakes and most action was around the starting position.
The figures were 15mm, mainly Brenton's, but with a few of mine and maybe some more ...


The figures were 15mm, mainly Brenton's, but with a few of mine and maybe some more ...


Subscribe to:
Posts (Atom)